$400 Bathroom Remodel in Our Mobile Home
A Beautiful Bathroom on an Itty-Bitty Budget
Finally! Finally! We did it! If you need me, I’ll be over here singing and dancing without shame, everyone. Our guest bathroom remodel is finished!
This has been a long time coming. Like, three years long. Maybe that doesn’t seem that big of a deal, but this bathroom needed someserious help, y’all.
As I’ve mentioned before, our mobile home is 30 years old. You can’t really tell in other areas of the home. The kitchen is large and bright, the bedrooms are spacious, all with walk-in closets, and even our master bathroom has a lot going for it. But for whatever reason this guest bathroom always felt like a sad after-thought.
Dark.
Small.
Neglected.
We really began this project a few months after moving in back in 2013, knowing the first order of business would be to add some square footage to the bathroom. To do this, we extended the wall about 14″ in the adjoining bedroom. This decision added some much needed elbow room, making the space function less like a closet with bathroom fixtures crammed into it.
But, after the new wall was framed and sheet-rock screwed on, there it sat. Bare drywall, exposed screws, and mismatched floor. For three more years.
It would seem, however, that good things come to those who wait. Because, man, am I excited to share with you what it looks like now!
But first, let’s look at some of thebefore’s.

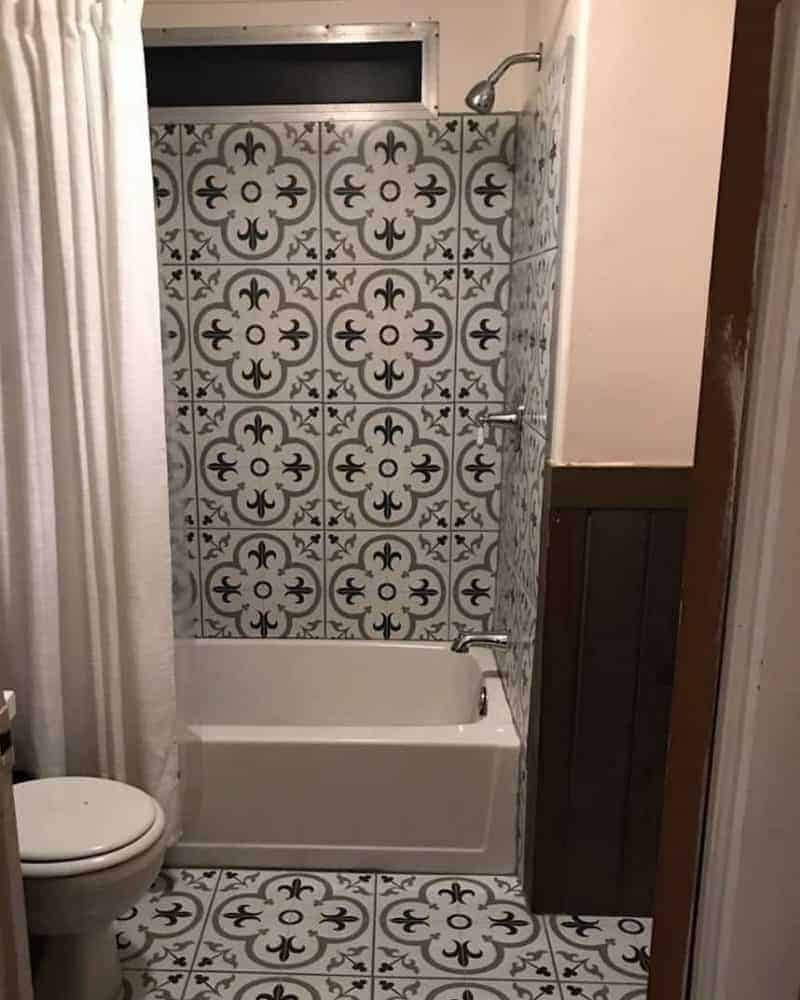
As you can see, there were a few unsightly issues with this bathroom. Firstly, the shower had had its run. It was still functional, still solid, but was discolored from all the years of soap and water build-up. There was no amount of elbow-grease and cleaning solution that could help with that.
Second, the previous owners had laid down peel and stick tile over the existing linoleum, which, really wasn’t an upgrade. Besides that, the added on area was still raw plywood.

Third, the paint color just felt… wrong. It was supposed to be a sort of camel brown, but the lighting always gave it a greenish undertone.

And lastly, the bathroom vanity needed a little bit of sprucing up. It was in fine shape, but was dated and just as unappealing as the wall color.
Sticking to the Budget
So, how did we accomplish all of this with only a few hundred dollars to spend? Well, I am nothing if not frugal. My first rule is alwaysuse what you have.And, if that isn’t an option,buy used not new.
I assessed the bathroom situation and came to the following conclusions, which helped me come to a realistic idea of a reasonable budget (considering we could do all the work ourselves).
What we could reuse: the bathroom vanity, medicine cabinet, toilet, and existing drywall. We could refinish these items and make them feel right and fresh for the space.
What materials we already had: free wood for the wall paneling, a shelf for the wall, and decor. We had received a stack of stained planks of wood just right for a rustic wainscoting. I also had an old shelf, currently painted John Deere green, just waiting to be utilized in our home. And there were plenty of nick-nacks and little items I could scrounge around the house to use as appropriate decor.
What we could buy used: the bathtub. As I mentioned, the shower really wasn’t something I wanted to re-use. But bathtubs tend to cost upwards of $300. That would have been our budget blown right there.But, not if you know where to look. I hopped on Craigslist and found a brand new bathtub for 100 bucks! It was the right size, the right drain side, and the right price.
What we needed to buy new: floor tile and tiling materials. Unfortunately, materials are one of those things that just cost what they cost. Unless they are bought wholesale, tile, mortar, grout, paint, etc. is something you buy at the mercy of your local hardware store. These items are where we spent the majority of our budget.
You Have to Start Somewhere
One of the most difficult decisions in remodeling is knowing where to start. You stand in the doorway and look around, thinking of all the things that have to be done, and oftentimes, it feels overwhelming to get going.
My advice? You have to start somewhere. Just get in there. We (my husband) pulled the tub out, pulled the old floor up, and gently removed the vanity. This gave us somewhat of a clean start so the new bathtub could go in, the paneling installed, and the drywall patched in where it needed to be.
Next, we re-installed the vanity so we (again, my husband) could layout the tile and decide where he wanted the cut tiles to end up. I asked him what advice he had for tile DIY’ers out there on this process.
He said, “Layout your entire floor, first. Even make some of the first cuts. The last thing you want is to spread your mortar only to realize you didn’t figure out the complicated parts first. The pressure is on once that stuff starts drying.”
Thanks, babe. Good advice. Also, thanks for letting me just be in charge of the pretty stuff.

Next, I started started the refinishing process for the medicine cabinet mirror and vanity. I unscrewed the hinges of the mirror, and took it outside to remove the white paint. My plan was simply to sand it a little and give it a fresh coat.What I found, however, was that I really loved the original wood frame. It took a little more sanding than I originally intended, but the finished product was totally worth it.
For the old shelf and vanity, I used the same dark navy paint in a matte finish, which played nicely with the navy detail in the tile. This process was really easy with no surprises, which is rare in the world of DIY, but I’ll take it where I can get it.
On the countertop, I used a high quality white primer, Zinnser 123, and Minwax Polycrylic to seal it. I love the contrast of the bright white, dark blue, and warm wood.

Across from this, I opted for towel hooks instead of towel bars. For no other reason than I just liked the look of the hooks better. They were easy enough for me to install after a simple matter of measuring for equal spacing and marking with a pen for accurate drilling.

And that’s it. The work took a couple of weeks to complete, including the demolition and prep. We fit it in around our day-jobs, utilizing time in the evenings and weekends. And I am so happy, grateful, relieved, ECSTATIC that it is finished.


Have a question?
Drop us a message and we'll get back to you with some answers!